Friday, February 24, 2012

Tutorial: Cutting your very own pair of Demi Lashes! + How I apply them!

I absolutely love using these lashes!
I actually bought the lashes in full a year ago and loved them in the picture!
They looked so cute! Once I had purchased and received them in the mail and popped them on for one of my fotd posts.... They looked absolutely horrid...! (evidence: here).
But not only did it look horrid but the band was incredibly stiff and difficult to apply to my lashline!
So sulky Alice was left with another box of lashes that she'll never use again....

Then, many many months later... I pulled out my stash of lashes and picking up the shameful box... Then it came to me! These lashes would make a perfect pair of Demi's!

So I snip, snip, snipped away, popped them on and they not only looked great but they only cost one half of my lashes!

This is a little tutorial on how I create my Demi lashes!
(Which I wear very very often! I can't find pictures.. But in recent posts, I've worn them here and here)


With a bit of eyeliner, curling and mascara (optional, heh), it'll blend in nicely ☺

The little box of heaven!

Fun little flirty lashes and super simple to maintain - Really! It feels like there's nothing on my lashes (besides when I'm wearing lashes, apply it incorrectly and then it get's stuck in my frames with every blink -_-)


------------------------------------------------------------------------

How to snip your own pair of Demi-lashes!

You can actually follow this tutorial with a many types of lashes! It doesn't particularly have to be the ones I have. I'm tried it with full length lashes (here) and lashes that are longer in the middle (here).

 1. Pull one lash (... you know what I mean.) from the box and trim the little tails that come with it.

2. Determine where you want to make the cut! The middle bit will be at the outer corners of your eyes. 
Why? We'll be using the ends of the original lash to be the inside ones as it's shorter and will blend much more nicely!
3. Fold evenly until both ends touch.

4. Snip away my darlin'.


 5. Yay! We have two pieces! 
I ended up snipping the long bits off on the outer corners so the end of the lash will be short (Refer to first image).


------------------------------------------------------------------------


How I apply my Demi-lashes!

(After curling, applying mascara and applying eyeliner!)

This is just a side tutorial.. On how I apply my demi-lashes. 

Since the lashes are trimmed in half, they aren't as curved as they were when they were a full! So it will be harder to apply once the glue is all tacky and you're trying to align the lashes onto your lashline. 
If you have a stubborn, stiff band like mine to work with, your lashes WILL end up falling off (it has happened way too many times to me)!


 1. Glue along the band

 2. Take hold of either side of the lashes


3. Gently push them together until they form a 'u' shape...
While you're holding it in this shape, blow onto the lashes until it becomes tacky.
Now your lash will be curved and ready to apply. 
Apply as you normal would, I apply the end of the lash where my natural lashes end.
You don't want to go out too far or your eyes will just look droopy.

And you're done!

The result...

 Look how cutesy they look flared out like that!
Don't you wish they were your real lashes? I certainly do.

Hooray! (By the way, do you like my necklace? I put it together myself  the other day :D)

Thank you for reading my tutorial!

I hope this helps give you the courage if you ever decide to spruce up your eyes with a pair of unwanted false lashes like I have :)

Tuesday, February 21, 2012

Priceline & Cosmopolitian Beauty Workshop

It was last minute last Wednesday night that Tram and I decided to go to the Beauty Workshop held by Priceline & Cosmopolitian the next day!


Neither of us has ever been to one of Priceline's Workshops before but I'm sure I've seen it in their newletters but hadn't thought much of it... But luckily we had decided to go! 

I had a lot of fun since it was so interesting seeing how renowned MUA, Helen Dowsley applied the latest trends on two people from the audience - one of the special people chosen was a fellow blogger, Katherine! (She just started blogging this month! You should check her blog out!)  


The set up

It was such a nice surprise seeing Katherine and Jeanice there! 

Jean and myself


 Helen Dowsky working her magic doing a 'Hollywood themed' makeup look on Katherine!
She looked amazing afterwards, the red lip really suits her!

 Meeting the gorgeous Leigh & very talented Helen!

All thoroughout the evening Tram and been saying how she was craving cupcakes,
so she bought us one each - The cutie!


She bought me a Red Velvet cupcake and got herself a Vanilla one!
It was the first time I've ever tried Red Velvet - So yum! (I must learn how to make it...)

Oh my gosh... the items we had gotten in our goodie bag!
Not only this, but they had given us a copy of this month's Cosmo magazine with an extra section just about makeup! I love it!


I'm eager to try the Nail foils, Garnier scrub and Volumising powder!
I have already tried the Nad's facial wax and to put it short- it's brilliant!

Thanks for reading!

Monday, February 20, 2012

Tutorial: Colourful Rainbow Eyeshadow Look

Hi!

I previously did a rainbow look in 2010, here.
(I don't know why I didn't blog about it.... I was trying to look for the post!!)

This variation is more subtle since I'm only focusing the colour along my upper lash line.
I like both looks though!


Now the tutorial begins!


Step 1:
Start with bare lids.
I didn't use any primer since the jumbo eye pencil I'll be using kind of acts like one!

Step 2:
Cut a 2~3cm piece of sticky tape and stick it where you would like your eyeshadow to wing out.
I aligned it so that it was on the same angle as my lower lash line!


Step 3.
 Using a white base, I'm using NYX Jumbo Eye Pencil..


Line along your lashline, this will be the base of you eyeshadow so it will be completely covered!
You don't have to be too careful since you can remove the unwanted base after this step.

I lined my upper eyelid how I wanted my eyeshadow to wing out, apply it like you would with liquid eyeliner, but thicker! 

Step 4.
 Using makeup remover with a Q-tip, 

Clean out the edges so it's soft and straight.
My makeup removed is oil based so I dabbed my eyelid with a tissue so it wasn't slippery anymore.

Step 5. 
 Now grab all the colours you want to use! I used the colours of the rainbow, in that very order.
So from the inner corners of my eyes Red>Orange>Yellow>Green>Blue>Purple

I started with red in each corner and with each colour I added, I patted it onto the previous colour softly so it would create a gradient effect.

Step 6. 

 Once your satisfied, clean up any unwanted eyeshadow fall out and remove the tape! 
Yay, a nice clean pointy line!


Step 7.
 Line eyes, apple white eyeliner to your bottom water line, apply mascara to bottom lashes, curl and apply falsies!

You're done!!!


Yay! I hope you've enjoyed this tutorial and found it useful.

 Wandering little strand of hair

I'm as blind as a bat without my glasses :(

Products used (in order):
Manly 180 Palette (review here)
NYX Jumbo Eye Pencil in Milk
Neutrogena Makeup Remover
Revlon Colorstay Liquid Liner in Blackest Black
Mirenesse Vibralash

Thanks for viewing!

Wednesday, February 15, 2012

Drugstore Flakie - Australis 'Speck-tacular' Swatches on top of 'Blackmail'

Hi!
You would have not been able to imagine how excited I was once I had known that Australis has come out with these flakies!
I've always wanted a flakie every since seeing the Inglot ones being sold at IMATS and now there's a flakie under $10 at any leading retail store I walk into!

Strengthening top coat with holographic reflective flakes! Ohhh, so many goodies in one! 

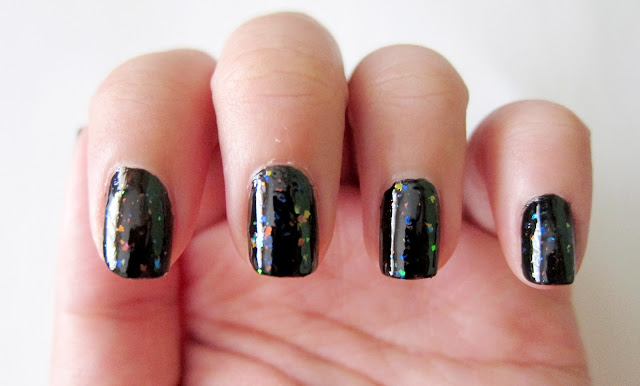
Flakies look 100% better against a dark background, I will be using Australis' 'Blackmail'.


Top: Australis Flakie in Speck-tacular
Bottom: Australis Nail Polish in Blackmail 

Both nail polishes have the same brushes
I've used Australis nail polishes before and compared to Blackmail, it is very different to the consistency of my first two Australis nailpolishes.. It was not runny, has average drying time and has the right consistency.

Two coats of 'Blackmail'

The Australis flakie is not only gorgeous but it serves with a topcoat and strengthens nails too!
 (Well we'll just have to see about the strengthening bit...)

Brush for the flakie, look at those pretty little specks!

2 layers of Speck-tacular on my nails on top of Blackmail!

And 3 days later...
The Speck-tacular top coat is holding up pretty well!
'Speck-tacular on top of 'Blackmail'
Left to Right: 'Blackmail' alone, 1 layer of 'Speck-tacular', 2 layers of 'Speck-tacular'

Gorgeous isn't it? I would like if the specks were a teensy bit bigger though!
I would love if Australis from this point, were to create more unique nail polishes that no other drugstore brand has, like holographics, magnetic and super super glittery ones! 


Available at:
Leading retailers and pharmacies (Big W, Priceline, Target, etc)

Price:
RRP $8.99 


Disclaimer: The products listed were gifts from Australis. All opinions are those of the author.

Tuesday, February 14, 2012

Glossybox - February Valentine's Edition

Hi! Happy Valentines Day everyone!
When Sue had tweeted that Groupon was having a deal on $7 Glossyboxes, I straight away purchased my sister and I one! $7 for a Glossybox... When they're $15 a box. I've always wanted to sign up for beauty boxes, Glossybox in particular since they always seem to have the best value out of a majority of the beauty boxes.


 Cutesy pretty packaging just for Valentine's Day! I had been expecting quite a bit from this box since it was Valentines Day.
It also came in a sturdy pink box, I can't wait to reuse it! 


 Lovely packaging! 

Products in the box:

When I read 'Nail files' I pictured a 15~20cm nail file... The nail files turned out to be my favourite item in the box...
Ahhhh! So cute! 'Star and Rose' Emergency Nail Files. It came in rows of six which are detachable from the base!
I love it! It's so handy too since they're so compact and it is quite often when I break a nail and need to file it away!

Lollies, I knew these would taste like Rockets straight away as soon as I saw it! 
Aww and they even had prints of cute little messages on each lolly!


Overall, I'm okay with this box. I don't really care so much about tanning, mascaras and even if I fall in love with the Proactive deep cleansing wash ($39.99), I would not repurchase since it's over $20.

I have never heard of 'Polished London' ($7.99), the shade looks lovely though! Different from any other shade I have.

I noticed that there are different variations of this February Valentine's Edition box.
I wish I had gotten the 'Spongeables' sponge heart in my box... Looks so exciting!

I'll stick around for the next box and see how that goes ☺.

Thursday, February 9, 2012

NOTD: Striped Pink Hearts - Valentine's Day Themed Nail Art

Hi!

I decided to do girly nude sparkly nails for Valentines Day!

It was fun and didn't require much effort *yay 
Post on how I spent Valentine's Day here


Used:
Ulta3 in Allure
BYS Pink
L.A. Colours Nail Art Polish


I didn't have a baby pink so I mixed a dark pink, a drop of Allure and two drops of a white nail polish.


I haven't used a top coat over the rhinestone yet! I've been expecting it to fall off by now... Hehe.
The little hearts on my middle finger and thumb look really sloppy but from far away they look fine!

Copyright © 2014 Arsyparsy